Quick Started
This chapter will take you to quickly make a simplest video.
Download and install
Currently, if you have any problems with the software (beta) download, please see [todo...]
Create a video project (folder)
The first time you open the software, there will be a pop-up window, select an empty folder as the storage place for the project.
Folder directory structure (location of software open folder):
.proj(store necessary information, please don't change it)- You can store any resources (pictures, videos, audios) in here.
- ...
The entire project folder can be copied, moved, deleted, etc. It is the same as a normal folder.
Write a manuscript
Write the manuscript in the left frame, each paragraph of text as a scene (scene).
If you need to understand the function in depth, you can refer to detailed document of the manuscript
Create element
Select any text as a keyword, and select the box in the tool box that appears.

Then, drag in the screen on the right to create it.
For the creation and deletion of elements, and their relationship with keywords, please refer to Elements and Keywords
Adjust elements
When the element is focused, go to the setting box in the lower right corner to set the element's attributes.
For detailed editing of elements in the screen, please refer to Screen Editing
Create key points
Select a word in the following text, and then click the ⊕ button to create a new key point for the element (similar to a key frame).

Such an element has two states (keywords).
Place the cursor on or after the second keyword, and then change elements in the screen, such as dragging.
Then, click the preview button ▶ on the left, and the effect is as follows:

When playing, the software will automatically connect the state of the same element to become a transition animation.
Similarly, animations such as disappearing can also be set (No need to set key points anymore).

**Note: Hover (hover) the mouse on any button for a short while, there will be a prompt. **
For more animation production, please refer to Animation Production
Recording
If you don't want to record, you can skip this step, the software will automatically add machine-readable dubbing when exporting.
Each paragraph is recorded separately (practice has proved that the shorter each paragraph, the less the total recording time).
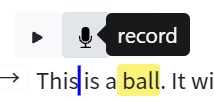
Click the recording button to start, and click again to start the text and the recording to automatically align. This takes about 10-20 seconds.
You can also continue to record the next paragraph while waiting, and support multiple paragraphs to be recognized at the same time.
In addition, please try to record in a quiet environment, noise will affect the recognition success rate.

You can record repeatedly, and you can add/delete audio.
For more recording and alignment, please refer to Recording and Alignment
Export video
Then click the Export... option of ☰ in the upper left corner of the menu, set it, and you can export.
Detailed documentation
For detailed documentation and video tutorials, please click here